If you are attending a cap workshop with me, watch these short videos for an introduction to my research. The third video introduces making a cap using my pattern. Please print off the pattern, gather your materials, and if possible, cut out the parts before we meet.
The other thing to bring to the workshop is all kinds of questions about what you find here. I love talking about caps and can’t wait to meet you.
Introduction to my research about 18th C women’s caps.
About my museum reproductions.
Where to find the pattern and materials list. PRINT THE PATTERN, GATHER YOUR MATERIALS, AND TRY TO CUT OUT THE PIECES BEFORE WE MEET!
A brief tour of the capalog.blog, where I have chronicled my research.
The pattern is all here, all 48 pages. It’s very long, and I know that’s awful in a blog post, so here’s a Google doc version you can read and print as you like. The pattern is at the end. It must be printed on 8.5 x 11 paper so that the 1″ square is actually 1″ square. You may have to print it and then enlarge it to get it to do that. Here’s aPDF version of the actual pattern that might be easier to get to print right.
The Capalog Pattern
A Lappet Cap for Reenactors of the Revolutionary War Era
18th C caps are put together similarly, no matter the style. In brief:
Prepare the drawstring channel
Finish all the edges
Sew the finished pieces together
Those 3 steps, with a little more detail:
Prepare the drawstring channel: The bottom of the caul will have a drawstring, so on that edge, first create the hole the ends of the tape will emerge from, and then sew a channel the width of your tape.
Finish all the edges: most commonly, there are 3 pattern pieces: caul, headpiece, ruffle. (See definitions and stitch instructions on the Capalog glossary page. ) Edges can be hemmed, rolled, or whipped with the tiniest stitches possible. As there are extant examples of all these finishing methods, you can choose among them.
Edges that will be gathered are rolled and whipped to allow gathering as needed.
Sew the pieces together: pull the whipped stitch on the gathered part of the caul so it fits the headpiece. Sew together. To join a whipped gather, whip over the stitch again.
To sew the ruffle on, join the finished edges with a whip or butted stitch to the headpiece. For the gathered portions, pull up the whip stitch to fit as you come to those places.
If you have enough experience and that’s all you need to know, bless you and go for it.
For everyone else, read on.
INTRODUCTION
This pattern was created by Sherri Saines, author of the Capalog, and is a representational amalgam of all the period caps I have seen, as described in the Capalog.blog. I’d be so happy if you went and read about my research. It will probably help you interpret this pattern, too, and make us all more careful recreators of 18th C. life.
This pattern is copyright with a Creative Commons license CCbyNC license. That means you may use this pattern to make your own stuff, but you may not sell the pattern in any way, or make money from it. Any use or link to this pattern should include proper URLs and citations, including my name and the Capalog address, so it’s clear where it comes from, and that it is not yours.
If you make caps with this pattern and sell the caps, you have to include the citation information on the cap, so the buyer knows where the pattern came from. It’d be nice to tell them what a good resource this is, too, so they can come and read more.
You’ll notice I am not making any money from this pattern. That’s because I didn’t take the time-consuming steps to test, retest, and get it professionally sized and printed. This pattern work for me, and I hope it works for you. #capalogpattern. Share yours!
WHAT YOU’LL NEED
¼ – ½ yard of the finest white linen you can find/afford. The richer your persona, the finer the cloth. Wash, dry, and iron before use.
Hint: It was often done to make the ruffle out of a finer cloth than the rest of the cap. So you could indulge in a really small cut from an expensive piece just for the ruffle. Period lace is a whole research area of its own, and I can’t offer advice as to patterns, but it is appropriate for rich people.
12” of white tape, cotton or linen, 1/8” – ¼” wide.
White thread: I like to sew with silk, but regular cotton thread is good. I haven’t found a linen or wool thread that works for hand-sewing fine cloth.
Hand-sewing needles. The fineness of the thread and needles should match the fineness of the cloth. A test: the needle or thread should not leave a hole larger than the weave of the cloth when it passes through. Ideally, the thread disappears into the weave. I like milliner’s size 11s.
If you have a [bone] awl, the kind that tapers from one end to the other, it helps with making the hole for the drawstring.
Scissors to cut the pattern, and possibly other hand-sewing tools you like to work with: a thimble, a stitch guide, etc.
DIRECTIONS
Print out the pattern on 8.5 x 11 paper and cut out the pieces you will need.
Make sure the 1″ square block on the pattern is actually 1″ square. If necessary, use a copier to enlarge the pattern pieces.
Choose your size:
Large caul (big hair, large head)
Small caul (child, small head)
Lay out and cut the pattern pieces.
In period, efficient use of cloth was a major concern, so let’s think that way.
Begin by pulling a thread to make sure the edge you are working from is straight. Any straight edge on the pattern should be cut in this way, that is, rather than cut along the pattern piece, pull a thread and use it as your cutting guide to create a truly straight line. These straight cuts make hand sewing a lot easier.
For a folded edge, fold over only as much cloth as is needed, so you are cutting the edge, not the center of the cloth.
I can’t think of an instance where using the selvedge as a straight edge is beneficial. You don’t want it to be seen, so you’d have to hem it somehow, and then it would be bulkier than the rest. Cut off the selvedges.
For ruffles, I suggest 1” wide finished width as an average, but some variation is allowed as per your preference. Using the pulled thread technique, cut a strip about 1 1/2” wide and about 40-60” long. You may or may not use all of it.
Hint: Any pattern piece can be made of 2 pieces of cloth joined with a minute felled seam. This is common along a ruffle or at the top of the headpiece. If you do this, allow an extra ¼ at the join when you cut it out.
Sewing: step one: Prepare the drawstring channel.
At the nape of the caul, there is a circle where the drawstring exits the gathering channel. Using the tapered awl, push through the weave to make a hole here about ¼’ across. Try not to break any threads. Use a buttonhole stitch to finish, sewing against the awl.
Fold the bottom of the caul up twice to make a drawstring channel and hem the edge. The hole should be on the inside center.
Note: some caps in period do not have the center hole, but instead leave the channel ends open, attach 2 long tapes, about 20+” to each end, cross them in the channel, and leave the long ends hanging. This works really well, and you can then wrap the long strings around your head to secure the cap a little.
Sewing: step two: Finish all the edges.
In the following instructions, “finish” means to hem, roll, or whip the edge. Your choice unless otherwise stated.
Caul: starting at the bottom edge, finish the edge up to the mark on the pattern, and knot off.
After the mark, roll and whip the edge until you reach the mark on the other side.
Hint: Start with a really long piece of strong thread (one of the reasons I like to sew with silk.). Make a big, loopy knot that will be easy to find and pull later. Whip over to the other side. Make another big, loopy knot here. Don’t pull it to a gather yet.
Go back to your finish technique and sew from the mark to the bottom edge.
Headpiece: Finish around the entire piece.
Hint: Curved edges can be tricky. Especially the ends of the lappets, where you have to turn in a very small space, tucking and turning at the same time. I’ve had luck with sewing the straight parts and then going back and sewing the curved edges. After many years of experience, this is still a challenge, so be patient with yourself. I’ve seen some pretty rough turns on period caps, too.
In the first photo, you can see I joined 2 pieces with a small felled seam to make the headpiece because I didn’t have enough cloth to place the pattern on a fold there.
Ruffle: Finish one long edge and two short edges. You should have a longer ruffle than you will need, and you may end up cutting off and resewing one short edge, but it’s easier than trying to figure out which end doesn’t need to be finished!
The other long side will be the gathered side, so roll and whip that side. Don’t pull it to a gather yet.
Hint: I have not found a way to predetermine where on the ruffle the gathers will occur. Whipping the whole side means I can sew along until I get to a ruffly place and pull it up to fit when I get there. This isn’t ideal; it’s hard to find the gather thread to pull, for example, and when you get there you are trying to do 4 things at once, usually around a curve, and it’s really awkward. Still, it’s the best method I can offer so far.
Sewing step 3: sew the finished pieces together.
Sew the Caul to the headpiece. This part takes some working, so start off with your patience in hand.
Mark the center front of the headpiece and the caul with a pin. (Find the center front by folding the piece in half.) With right sides together, pin this point.
Hint: check and double check that you have the pieces in the right places. The headpiece will be under / inside the caul as you work it. I’ve sewn the headpiece on inside out numerous times.
Pin the bottom points of the caul and headpiece together. (In this picture, the headpiece is on the outside, but I’ll flip it inside in a minute…)
Pin the caul and headpiece together at the mark where the stitch on the caul changes from the finish stitch to the whip stitch.
The cloth that is gaping between the mark and the center front on either side is how much has to be gathered to fit the headpiece.
Note the center of these two halves on the headpiece and caul; that is, we are finding the quarters on the to-be-gathered portion. Pin these together, too.
Now grab hold of one of the big loopy knots at the end of your whip stitch, and gently pull to create the gather. Usually you have to pull it as tight as it will go, which creates a row of regular bumps that look like popcorn. You are trying to space the bumps equally along the line of the headpiece from mark to mark.
Pin it all down. Use a lot of pins, about every inch.
Start from one end.
Sew with a whip or butted stitch up to the mark and knot off.
Change to a whip stitch when you get to the gathers. With the caul toward me, and the popcorn at the top, whip over the previous stitches, catching the headpiece underneath as you go. Knot off.
Hint: when you “catch the headpiece,” make that part of the stitch straight up and down, not angled. That will allow the gather to lie neatly. This takes some practice.
Change back to your finish stitch and sew the straight part from the mark to the edge.
Sew the ruffle to the headpiece.
Depending on the style you have chosen, you could be placing a ruffle all the way around the cap or just down the front of the headpiece. You have a lot of latitude here in amount of ruffle. See the Capalog.blog for many variations.
Start at one end of the ruffle placement. With right sides together, and the ruffle on top, whip over the previous stitches, catching the headpiece underneath as you go.
Hint: when you “catch the headpiece,” make that part of the stitch straight up and down, not angled. That will allow the gather to lie neatly. This takes some practice.
On lappets, the only gathered portion of the ruffle is at the turn of the lappet. When you get within about an inch of the point, stop and lay your needle and thread aside so it won’t get in the way. With a pin, find the stitches on the ruffle and pull up the thread to create a gather just tight enough to get around that curve and about 1” up the other side. It’s hard to pin the ruffle down to sew it on in that tight space but do your best. Sew the gathered part, and now you can keep on sewing until you get to the other lappet point and do the same.
Hint: it is possible to pull it up too tight and get a flower effect at the end; it is also possible to not pull it up tight enough and then the ruffle will not lie flat. (Sigh!)
Finishing
Thread the linen or cotton tape onto a large-eyed blunt needle. Thread the needle through the channel to one end and push out through the weave on the inside corner, trying not to break any threads.
Pull the tape through just enough to fold it under about 1/8” and pin it, covering the join. Go back and do the same to the other side. You now have a tape pinned on 2 ends with the middle sticking out of the hole on the inside.
Sew around each end, sewing the tape down onto the cap. This is a good time to cover up any irregularities or unmatched edges at the join. It reinforces the seams that meet here, too.
Now cut the tape in two where it is sticking out of the hole. Period caps don’t have their tape ends hemmed, so you don’t have to do that.
Add 2 short tapes (4”) at the points of the lappets if you desire. The ends can be pinned, or tied with a tape or a ribbon.
Clip any loose threads, oversew any loose seams, take a picture and post it so we can applaud your hard work. #capalogpattern
HOW TO WEAR YOUR CAP
Pull your hair straight back and up and pin all the stray whisps. Gather the tape at the back of your cap until the caul fits over your hair. The ruffle should be back from your face. Some hair should show at the front, and some can show at the nape of your neck, too. A cap never covers your forehead or eyes or cheeks. It frames and enhances your face. Lappets are usually pinned or tied under your chin.
Hint: To keep your cap on: put 2 opposing bobby pins in your hair right at the top of your head. This is good for keeping your hair up and back anyway. Put your cap on and with a long thin pin, attach the headpiece of the cap to your hair right in front of the bobby pins.
The Pattern:
Print out these 3 pages. Make sure they each take up the whole 8.5 x 11 page. Alternately, enlarge as needed until the 1” box is really 1”.
Print out a cleaner, brighter pattern in PDF from this Google Drive File.
I am often asked about which stitches were used when on caps. There’s a theory afloat about which stitches are likely to be earlier and which are likely to be later. I can never keep it straight. So I’m not trying to prove or disprove anything here; I just know it’s a question, and here’s my data.
The gathered CF ruffle of DAR 1203
I did a quick and dirty run down of this on Facebook a couple years ago in the “Historically Accurate 18th and early 19th Century Sewing” group. That group is retired now; but I can still get to the archive. Perhaps you can only see it if you were a member, but a lot of my readers were. Still, it’s OK if you can’t get back to see that, because now I’m going to go back and be more careful.
First of all, we are talking about only 13 caps. I saw more than 100, and started off saying there were about 30 for the time period, but in the end I’m only betting on these 13 as being 18th C. I have described them all in the posts on this blog. (I started by counting a whole set of caps that were dated 1800-, allowing for wiggle room, but in the end I decided not to include them because there were differences that seemed to attach to the date.)
I’ve laid these out earlier to later (museum date) in the chart below. Remember, it’s a small data set.
Also, there are many places where a cap is stitched, and most caps are put together with several different stitches.
I’ve tried to make a nice, easy, chart here. I had trouble, as you can see, with spacing; it still looks bulky on the page, so here’s a Word Doc for you, too: stitch chart rev
Can we draw any conclusions here? We might say that the earlier the cap, the more often the gather on the caul is likely to be a stroke gather. On the other hand, several of these have no gather, or are constructed so there is no join. And the ruffles in all these examples are whipped gathered, so it doesn’t mean they weren’t using that stitch.
Why did they use so many different methods and stitches? I think it is because joining the caul to the headpiece is much more complicated than adding a ruffle. To add a ruffle, I make a straight piece with a whipped edge that can be pulled to a gather at any point, and I whip that piece in place. To join a caul to a headpiece, I have to switch from gather to finished edge somehow without creating bulk; the transition is awkward. Then, I wonder why every edge isn’t whipped? Wouldn’t that be easiest?
Caps with a simple rectangle for a headpiece appear early and late in the 18th C. This cap is probably an early one, but with so little to compare it to, it’s best guesses all around. Its home is the McCord Museum in Montreal, Canada, #M980.4.26. It does not have an online record. The museum dates this cap as “late 17th? or early 18th” Century. If that’s true, it is the oldest cap I have found.
The Original
This one is very simple: a half-circle caul of linen attached to a rectangle of lace for a headpiece. A tape gathers the caul at the nape, as is common.
The lace headpiece will help us date the cap, perhaps?
The large size assures me this is an adult cap: 9″ high by 9.5″ from back to front edge. The caul is made of two pieces, felled together down the center back line, with about 10 big stitches per inch. The front edge of the caul is hemmed back with a 3/8″ seam. There aren’t any gathers sewn in. The only gather is the drawstring along the bottom, which isn’t drawn through any casing in the cloth, but caught up within a looped string. Two tapes, anchored at opposite ends, pull across one another through these loops to effect the gather.
The headpiece is a rectangle of lace with a motif of birds and flowers. Is is whipped onto the caul with big uneven stitches. The bottom edge is finished with another piece of lace sewn on that is about 1/2″ wide; the front is edged with a piece that is about 1/4 wide. This makes me think the large lace piece is cut on those edges. One of the points has a small loop – for a tie or button? Please someone who knows lace come behind me here and help with the lace description!
At the join of the headpiece and caul (inside), the arrangement of the tapes, sewn down, doubled through, and attached with a looped string.
The lace that edges the bottom is sewn on with large straight stitches.
The felled join of the back of the caul can be seen, as well as the way the string is sewn down to create the loops.
The hemmed caul and placement of edging laces.
The lace design isn’t exactly centered; another reason to think it was cut from some other use.
Questions that remain
Other Squared caps that we have access to are few. Burnston covers two of these in Fitting and Proper, pps 35-37. She dates these 1790-1810. (West Chester, PA., items # 1989.1995 and # 1994.3270; I got to see 1994.3270, but didn’t see 1989.1995) Her descriptions in that book are clear and detailed, so I won’t repeat them here. The other place a squared cap is described is in Rural Pennsylvania Clothing. (Caps C and E, pp 68-69.) Gehret notes these caps are late 18th C (some say they are even later.). All that to say there isn’t much to compare this cap to, especially if we want to date it to the early 1700’s.
Being housed in Montreal also adds the complication of possible French influence. The museum record notes the provenance as “Antwerp?” so it might be Belgian. If so, it is technically outside the scope of this study, in which I am trying to keep to items from places that became the United States.
Still, if it is “late 17th, early 18th” century, it is the oldest adult cap I have found.
Portraits
Ann Pollard, 1721, wears a cap with a squared-edged headpiece.
Few portraits show caps with squared headpieces. Or, we might say, in few portraits are we sure we are seeing a really squared headpiece. In many portraits, the cap is high and back too far to be sure; only the ruffle suggests the shape.
Ann Pollard was 100 when she had her portrait made. Her caps looks definitely squared at the edges. Since she is aged, I wonder if this was old fashioned at the time? I’ve only found 2 other portraits with the same shape cap, and they are also early.
Then, in the 19th C, they show up again, and styles take off with additions of deep lace & ruffles, inserts and embroidery.
Thank you to Alexis Walker, Curatorial Assistant, Costume and Textiles, who corresponded with me and helped me at the McCord. I have written for her permission to use these images and discuss this artifact here.
Photos by the author.
Other Related Scholarship
I am not aware of any other scholarship on this cap.
We’re going along swimmingly across the 18th C, with familiar cap shapes: lappets, round-eared caps, laces and ruffles, linen on linen. Familiar construction, familiar materials, and then, 1775, this happens:
Mrs. Izard’s cap is something new: the Dormeuse. 1775.
The Dormeuse
What’s so different here? For one, the headpiece is split, or at least shaped like wings. This is something new. It is decorated with not just a ruffle or lace, but poufs of ribbon, a large, wide, white, striped ribbon tied in a loopy bow, and another row of gathered lace where the caul and headpiece meet. The caul is much larger than it has been, and held back and high up with, one assumes, her hair. Her neat ‘do is visible in the triangle between the cap’s wings.
This is one style that has its own name: the Dormeuse, from the French word for night cap. (Cumming and Cunnington, Dictionary of Fashion History, 2010, p. 68.)
Mr. and Mrs. Izard are colonials touring Europe at the time this portrait is painted, but it quickly comes across the water, and the cap continues to grow larger.
Winthrop Chandler painted this portrait, “New England Woman” about 1775. Her large floppy cap is very much the mode.
This woman’s cap, abut 1775, has the characteristic high point at the center front, and very large, baggy caul. Something is tied at the side back, leaving loose ends flowing behind. The ruffle is pleated lace. We’ve gone from an enlarged but still neat and fitted caul to a roomy, baggy, rumpled look.
Mary Kimberly Reynolds, 1788, in her grand pouf.
And it doesn’t end there. Time passes, and the Piles just get higher. Kimberly Reynolds, 1788, has even more layers of wide lace falling loosely from her tall cap, and a big white ribbon on the crown of it all. It really looks like she just took all her best lace, arranged them on her head, and pinned them down.
And still it keeps growing. The next year, 1789, Mrs. Salisbury sports this incredibly impractical version:
Elizabeth’s cap is the same shape, just hugely enlarged.
All the same pieces are there: the pointed headpiece, layers of ruffles, the huge caul, the big white silk bow. There’s no way she could move about with that thing on her head! It must be pinned into her hair at a dozen different spots.
I would like to find more 1775-1783 portraits to see the whole range of styles here. Help me if you can! This is the evidence I am using when I say I don’t think Rev War reenactors portraying campfollowers should indulge in this fashion: as worn in the period, it is high fashion, requires dressed hair, and is too unwieldy for working.
The Corday
A related style that comes along a little later is the Corday, named after Charlotte Corday, depicted in such a cap as she awaited her execution for her role in the French Revolution. The distinguishing characteristics of the Corday are 1) the ruffle gets wider and wider as it falls from the CF point, so it is widest at the nape (while the headpiece itself is fitted) and 2) the caul is poufed up like a chef’s hat.
1792: caps that look to us like chefs’ hats are popular.
These have a neater look than the Dormeuse, starched and regular rather than soft and layered. These, too, reach crazy heights.
Mr and Mrs Elsworth, 1792. Her Corday cap is very high.
And then there are some odd items that I don’t even know how to categorize, like Hanna Bush: I can see that the double ruffles come out
Hannah Ackley Bush, 1791, in a cap that rides her big hair like a sail.
pleated on either side of a headpiece, with a wide lace bow around it. The whiffs to the right might be feathers, or a suggestion of further pleats. The caul is hidden, so we can’t discern its shape. A square piece of lace-edged cloth hangs down behind like a backwards apron. She has the same style echoed in her body linen: smaller pleats on the edge of her gown and really big starched pleats standing up from her bosom under her neckerchief.
Which makes no sense. Portraits attest that these were all the rage from 1775 ish to 1800. The whole last quarter of the century was full of them. So there should be more of these than other, older styles, right? Or at least as many? Or more than one? Why don’t we have any extant mushrooms to examine?
One thought I’ve considered is that there was so much cloth in one of these that as soon as the style passed, they were dismantled for the pieces and remade. Fluffy caps come back in the 19th C. Maybe those deep lace ruffles that curtain their faces are made from grandmother’s cap pieces. What do you think?
This is very similar to many other Quaker caps I saw in my travels, especially a group from Chester County Historical Society, but also individual examples in other places. It’s the only squared-lappet one museums date 1750-1800, though, and I want to talk about that while I suggest it’s more probably 19th C. This one is housed at the Phildelphia History Museum. Its item number is #87.35.826. It does not have an online catalog record.
The Original
Typical of turn-of-the-century Quaker caps, this is a lappet of a superfine cloth, gauzy and see-through. But while its shape is standard, its construction has some unique features.
Philly 87.35.826 is dated 1750-1800, but is more likely 1800-, when compared to similar examples elsewhere.
The headpiece and ruffle are all one piece. So is the caul and the bavolet, or ruffle around the nape. Then there is a third piece that’s really just the lappets pieced onto the rest of the cap. The shaping is created by strings in self-fabric channels in all three pieces. I’ve made a color-coded quick drawing to help you see what I’m talking about.
A color-coded version of Phill 87.35.826, to show construction. Probably 19th C.
The strings are all running in self-fabric channels just large enough to hold the string. I think there are two strings, but there might be three. One starts at the join where the lappet, headpiece, and caul all cone together, and goes back on each side, coming out to a visible bow at the center back, 1″ from the bottom edge. The other starts from the end of one lappet, wraps and over the CF, and comes out the other lappet, to be tied under the chin. It runs up the middle of the lappet, so it makes a pretty runching when pulled.
The caul is whip gathered, then sewn on to the (rolled edged) headpiece with big loose stitches, flattening the effect. All the outside edges are whipped to finish.
The characteristic that most gives away this cap’s 19th C date is the square end of the lappets. That seems to be one detail that curators I talked to agreed was a dividing point. In other examples, the gather up the middle of the lappet is created by finishing the edges of 2 rectangles, and leaving gaps in the join where the string is threaded. Here’s an example of that technique in another Philly cap, #1000.179.
Philly 1000.179 (not the same cap) shows a variation on the gather technique in a Quaker lappet, probably 19th C.
Questions that remain
I’m making a judgement call on the idea that there are only two gather strings. The one that goes up and down the front, creating the faux ruffle, might be two different strings. This cap was too fragile to manipulate much, but as it sits there is a slight pucker in the front string. Also, other Quaker caps with similar construction have sometimes a separate string, creating this false-ruffle effect. Sometimes it is just a silky thread, without even a channel, and the bow is at the CF. Kannik’s Korner pattern #6602 (view B) reproduces a cap like that.
Also, notice that the way the lappet is sewn on, it has to fold like a piece of origami under the chin. You are sewing a straight piece into a corner. Who came up with that? It’s very awkward.
Portraits
Margaret “Peggy” Custis Wilson (Mrs. John Custis Wilson) 1791 Artist: Charles Willson Peale (1741-1827) Colonial Williamsburg
I was so excited when I discovered this portrait at Williamsburg! Look! her cap looks like this one!
Two things are important here: Only a small number of portraits I’ve seen show a cap with the lappets hanging loose. Which is great to know — they did it too, and all ya’ll that complain about ties under your chin can use these rare exceptions to justify your attire.
The other great thing about the Peale portrait is that this has a solid date, 1791, which makes us feel very confident that these types of caps were being worn by wealthy people in our time period. But note the ends of her lappets are rounded.
Here’s the another example of a loose lappet. I hate to do this, but I’ve lost the identifying info on this portrait. Please, if you know anything about it, let me know.
I’ve now found four American and five British examples of loose lappets. They sometimes depict a person in an informal situation: dancing, socializing, shepherdesses, etc. Perhaps loose lappets are associated with informality?
One last one: John Greenwood’s portrait of Catherine Moffat, 1745. Her lappets are large and lacy, and lay comfortably on her shoulders.
Kristen Froehlich, Director of the Collection and Exhibits at the Philadelphia history Museum at the Atwater Kent gave me permission to use images I made and discuss this artifact here.
Photos by the author.
Other Related Scholarship
I am not aware of any other scholarship on this cap.
Version 4. added loose lappets info. crop and Identify that portrait; alt ref on 2 new pics.
Another of those rare birds: a cap with provenance. This one, held at Winterthur Museum, #1982.0064, was part of a group of needlework passed down through the Canby-Ferris family. The note with this cap reads, “Great-great grandmother Martha Canby’s cap – died 1826.” She was married in 1774, but no birth date is included. That puts the majority of her life before 1800, and no construction details make me think otherwise, so I accept this as a possible 18th C cap.
The Original
Martha’s cap is a well crafted example of what later became Quaker fossilized fashion in caps. A simple lappet, with no lace or froufrou. Made in three pieces: caul, headpiece, ruffle. The only gather is around the tip of the lappet where a short tape ties it under her chin; the caul is gathered with “kissing strings.” The ruffle skinnies as it goes around, and ends about 1 3/8″ back along the caul, but doesn’t wrap around the back.
Winterthur #1982.0064 is a simple lappet of Quaker provenance, beautifully crafted.
Every edge is first finished with a rolled hem. The bottom of the caul has a channel just big enough for the long strings that gather it. I hadn’t figured it out yet, but I think these are attached on either side after going through the channel. So they criss-cross in there, and pull at the opposite side. They come out where the caul and headpiece meet under her ear, on top of the ruffle. These strings aren’t tapes; they are small round strings. (Is that a datable clue?)
The top of the caul is whip gathered across the top 6″, then whipped to the headpiece along the rest of the join.
The ruffle goes from 1 1/2″ at the CF, and gradually skinnies down to 1″ at the turn, and 1/2″ by the time it gets to the end. I’ve pondered that before. But this is the most extreme example so far. The front of the ruffle seems to stay on the straight grain, so the difference happens on the join. You can see my confusion in my notes. I kept marking the grain as straight, but the width changed; what was changing? the ruffle? the headpiece? Answer: ruffle. The two finished edges of ruffle and headpiece are whipped together, and the seam is immeasureably small. Go ahead, zoom in on that seam. I wish my photos were clearer. I’d like to get another look at this cap.
The headpiece has a really narrow point, only 1/4″ across at the skinniest. The point is reinforced to hold that 5″ long tape. I’m not sure I’m looking forward to trying to reproduce that very small detailed work. The back edge of the lappet, from tip to under the ear, has a nice curve; sometimes that line is rougher, or straighter.
0verall, Martha’s cap is 11 1/4′ tip to stern, 8 1/5″ at its widest point laid flat.
Close up of Winterthur #1982.0064 shows the join of the caul and the headpiece. Each edge is rolled minutely before being sewn together.
Lappet showing where tape is sewn on to reinforced edge. The pin holds the museum’s ID tag.
The other side of the lappet. If only I knew which was the right side… Winterthur # 1982.0064
Questions that remain
My notes say, “Tape sewn to outside,” yet the picture shows clearly that the tape is on the inside. That’s because I was confused with this one, whether it was being stored inside out or not. That isn’t unheard of; I’d already seen a couple like that. 18th C seams can be so incredibly perfectly minutely made that you really have to look hard to determine inside from out. I think I had decided this one was inside out. You look and see if you can tell — again I wish my pictures were clearer. I only have an average camera, and lighting isn’t always photo-friendly.
Have I ranted enough about the sewing here? This one reminds me of the fineness of Mary Alsop’s cap. I’ve wondered if the edges I’ve seen are really selvages. That is, what I am seeing is not two edges rolled, then whipped, together, but two selvages whipped together. How could I ever tell? But this example, where the inside edge of the ruffle is NOT along the grain, sort of proves that edge, at least, is a hand-rolled edge.
The Reproduction
I haven’t reproduced this one yet. You try it, and share your attempt with us, OK?
Linda Eaton, Senior Curator of Textiles, gave me permission to discuss this artifact here. Lea Lane met me at the museum that day and helped me with questions afterward.
Photos by the author.
Other Related Scholarship
This cap appeared in Winthurtur’s exhibit, “Who’s Your Daddy?” The Exhibit Guide, Page 4, includes this cap, and references Martha’s ownership.
This beauty is at the Philadelphia History Museum, dated 1750-1800, #87.35.827. It is crafted of very fine linen, 11 1/2″ from tip to CF. A simple lappet, with those kissing strings and another example of a double ruffle. There is no public catalog record for this cap.
The Original
Philly #87.35.827 is a linen lappet with doubled ruffles.
The Caul is about 8″ tall by 4 1/4″ wide (measured flat). A 3/8″ casing at the bottom encloses a very thin linen tape. These tapes are attached to the far side of the channel, come out on the inside under the ear, and then hang down 19″ on one side and 12″ on the other. I assume the short tape is torn. The front caul edge hem is 1/16″, and when it turns into a whipped gather over the top, there are 26 miniature pearl-like stitches per inch. I counted.
The headpiece is also hemmed with that tiny hem all around, and butted to the caul and ruffle.
That hem makes an anchor onto which we can whip the ruffle. The ruffle is doubled. It’s made by hemming one rectangular piece of cloth all the way around, folding it off center, and whipping it to the headpiece on the fold. Note that for that to work, the outside edges have to be hemmed to opposite sides of the rectangular cloth. As is usual, the ruffle is only gathered enough to get around the point, and stops at the join with the caul. The ruffle gets skinnier as it rounds the tip, and skinnier still as it goes up the back of the lappet. (1 1/4″ at CF, but 3/4 at the far ends.) It is pieced.
The ends of the lappets are reinforced to hold the 1/2″ linen tabby weave tape. It is 4″ long, just enough to make a bow.
I only have one other good photo: a close up of the gathered turn of the lappet.
Questions that remain
This is from the Philadelphia History Museum, and most of its clothing collection is Quaker, and this cap is noted as Quaker. In the 18th C, that did not mean fossilized fashion. You could be a “gay Quaker” or a “plain Quaker”, which meant you went in for fashionable colors and embellishments, or you chose muted and simple clothing. Don’t take that to mean not fashionable, or not expensive. If you could, you wore silk of course. It’s on my list to write about Quaker fashion, as it was one of the many rabbit holes I went down on this journey.
Portraits
Mrs. James Smith, painted by Charles Wilson Peale, 1776, wears a cap like this one. The gathers under her chin are very subtle. The ties that hold the lappets are visible. She has added a ribbon. This is another example of an older woman in a lappet. I like it that her chins are still visible! She looks friendly. I bet this grandchild was a great favorite.
Mrs. Smith wears a double-ruffle on her cap.
The Reproduction
It’s frigid and snowing today. My repro of Philly 87.35.827.
After it was all made, I laid it on the drawing I made and realized it is about 1″ too small all over. *sigh* Philly 87.35.827 repro.
This was the cap that finally showed me how the double ruffles were put together. It was not nearly as clear in the first one of these I saw. Whipping the folded edge was neat and easy.
But, I didn’t finish opposite sides of the ruffle, so the inside ruffle shows its hem. But it’s really teeny — you’d never notice. And anyway, you can see both sides of the ruffle’s edge when you wear it.
I always wonder how they would know where to put the gather on the ruffle. Did they sew down from the CF, and do the gather as they went, where it needed to sit? I don’t have any evidence that there were patterns with that level of detail to follow. So this time I tried it that way, whipping it to the headpiece, and gathering as I went. That’s a whole new level of skill! I got it too tight again. Because you are sewing along a folded piece, at least you don’t have to roll that edge before you join it.
Which brings me back to the ruffle getting skinnier as it goes. I actually cut this out with a built-in taper. I’d like to go back to the original and see if I could find a taper in the ruffle. It has to, doesn’t it? and if the ruffle’s edges deviate from the straight grain, are shaped to taper on purpose, it means the place where the gather goes is predetermined. That was hard to explain. Do you see what I mean? Who did that math?
Another complicating factor is how much to allow for the gathered part. I was taught that for ruffles you allow about a 2:1 ratio. That is, allow twice as much cloth for the space you want to cover with ruffles. 12″ yoke? 24″ of cloth. But I am learning that the required measure depends on several variables. Most important is the weight of the cloth. No one can make 26 whipped gathers to the inch with a 6 oz. linen. But with super fine, maybe 2.5 oz., you almost can. So lighter cloth takes up more in a gather than heavy cloth. It also depends on how small a gather you can produce (stroke or whipped). It helps to have a long, fine needle, like a milliner’s needle, and fine, strong thread. Silk is a good choice. The needle should not leave a visible hole in the cloth, and the thread should be the same or lighter weight than the threads of the cloth.
I didn’t include my pattern because it was so off measure. I need to redo this one.
Thank Yous and Permissions
Kristen Froehlich, Director of the Collection and Exhibits at the Philadelphia history Museum at the Atwater Kent gave me permission to use images I made and discuss this artifact here.
Photos by the author.
Other Related Scholarship
There is no other research about this cap as far as I know.
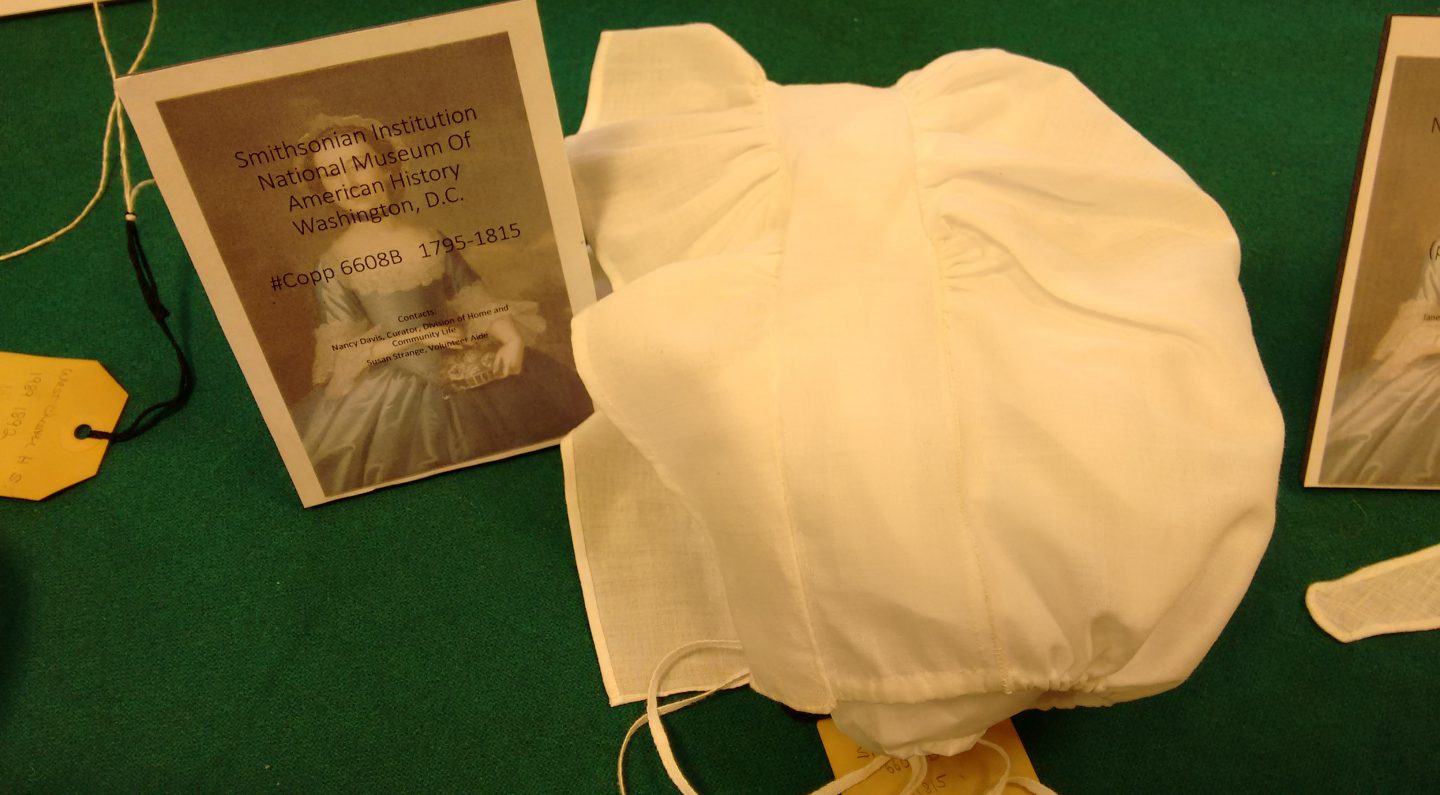
Several caps I’ve seen have double ruffles. On Smiths 6608-D, they are made of finer cloth than the rest of the cap, and the finishing hem, about 1/16″ across, has stitches so fine I couldn’t see them to count them. The effect is like an edge of tiny silk ribbon.
Smithsonian 6608-D has a doubled ruffle whose edge is invisibly hemmed.
The caul and headpiece are made from handkerchief-weight linen, but the ruffles are finer. The headpiece, including the lappets, is 10 1/2″ from tip to top. The Caul is stroke-gathered to the headpiece, and the edge left unfinished inside. A casing 1/4″ wide along the nape is made of a piece sewn in (I’m not for sure about that, but I can see the edges in the photos) to create the channel for Kissing strings, 18″ long, of 1/8″ linen tape. The tapes come out on the outside, just where the caul, headpiece, and ruffle all come together.
The headpiece is pieced at the top, felled together. It is hemmed all around with a tiny hem and then butted to the caul. You can see the stitches, like whip stitches, joining the two, but loose enough that the 2 hems sit side by side.
Then the ruffles: hemmed on the front side, and whipped to the headpiece, with a gather only around the lappet tip. The top ruffle is about 1/4″ skinnier than the bottom ruffle. I decided later, when I’d seen a couple more of these, that the ruffle was made from one piece of cloth, folded, and joined through the gutter.
The ruffles don’t go all the way around the back, but end 2 1/2″ past the point where the strings come out. Right here, the straight grain of the cloth has to bunch to get around the curve, so although it isn’t actually gathered, it appears so. But the top ruffle ends earlier, about an inch past the tip of the lappet….
Which makes me wonder. You can see in this picture, which shows the ruffle laid open on the left side, that there’s a little bit of cloth puckered up under there. Last detail: the ruffle goes from 1 1/4″ wide at the CF to 3/4″ wide at the other end, so maybe the difference is hidden here? After this point, there’s a felled join, and the single ruffle finishes the round.
What is the little fluff hiding between the layers of the ruffles?
The stroke gathers visible inside. And the exact and fine hems and joins.
The long tapes come out at the point where the caul, headpiece, and ruffle intersect. You can also see what looks like a pieced channel for the gather.
The skinnier ruffle (1″ at its widest) lays on top of the wider ruffle (1 1/4″ at its widest). The folded cloth, once hemmed, would be 2 1/4″ wide, folded at 1″, and whipped on at the fold. … I think.
Questions that remain
Why do ruffles get skinnier on the sides and back than in the front? It’s confusing because the grain of the cloth is straight on the outer edge, but the inner edge gets progressively more eaten up by the rolling of the whipped join? On purpose? Why?
And the Kissing Strings again.
Portraits
Remember Mrs Galloway? Her cap is an exact match.
Mrs. Richard Galloway, by John Hesselius (1728–1778), 1764. Held at the Metropolitan Museum of Art
Nancy Davis, Curator of Textiles at the Smithsonian’s National Museum of American History, helped me to identify items in that collection that were useful to this study. That was no small feat, as records were spread across several legacy cataloging systems, and details were minimal. I can only hope I found what there was to find!
Photos by the author.
Other Related Scholarship
I am not aware of any other scholarship about this cap.
*. . . which is not the same thing as the Smithsonian’s Cooper Hewitt, in NYC. Their textiles section was under construction at the time of this study, so I didn’t get to see their artifacts.


 18th C.")


 piece of cloth between the layers of the ruffle.")


